INTRODUCTION The liquid limit is one of 5 limits developed by A. Atterberg, a swedish scientist. The liquid limit is one of the most commonly performed of the Atterberg Limits along with the plastic limit. These 2 tests are used internationally to classify soil
The liquid limit is defined as the moisture content at which soil begins to behave as a liquid material and begins to flow. The liquid limit is determined in the lab as the moisture content at which the two sides of a groove formed in soil come together and touch for a distance of 2 inch after 25 blows. Since it is very difficult to get this to occur exactly, we will run the test repeatedly until the groove closes 1/2 inch with over 25 blows and under 25 blows. We can plot these results as blow count versus moisture content and interpolate the moisture content at 25 blows from this graph.
EQUIPMENT
Soil sample, Metal Mixing Bowl,Small Spatula, Liquid Limit Device, Water, IS Sieve of 425 Micron, Weight Ballance.
PROCEDURE
1. Obtain equipment Required for the Liquid Limit test.

2. Weigh 3 metal moisture content containers and record the weights. Keep track of the containers and their weights.
3. Pass the soil sample through IS Sieve of 425 Micron.
4. Now take about 120gm soil sample passed through 425 micron sieve & put the soil into a metal mixing bowl and add enough water so that the sample has a creamy texture like smooth peanut butter.
5. Adjust the drop height of the liquid limit device to 10mm using the block end of the grooving tool. Measure from the block to where the bowl hits the block.

6. Place the wet soil sample in the liquid limit device as shown below. This should be done by first turning the crank so that the bowl is resting on the base. The soil should fill the bowl similarly to the way water would fill the bowl. The sample should be smoothed and curved somewhat towards the bottom of the bowl. The depth of the soil sample should be no deeper than the triangular extrusion on the end of the grooving tool.

7. When the soil sample as adequately placed in the bowl, use the grooving tool to cut a groove through the sample as shown below. The bottom of the brass cup should be seen.

8. At this point, turn the crank at a rate of 2 turn per second until the groove closes 1/2 inch, as shown below and keep track of the blow count. Record the blows on the data sheet and obtain a sample for a moisture content.

9. Repeat the test. If the blow count from the first try was greater than 25 blows, add some water and repeat. If less than 25 blow were obtained, add dry soil, mix extremely well, and repeat until a data point above and a data point below 25 blows is obtained.
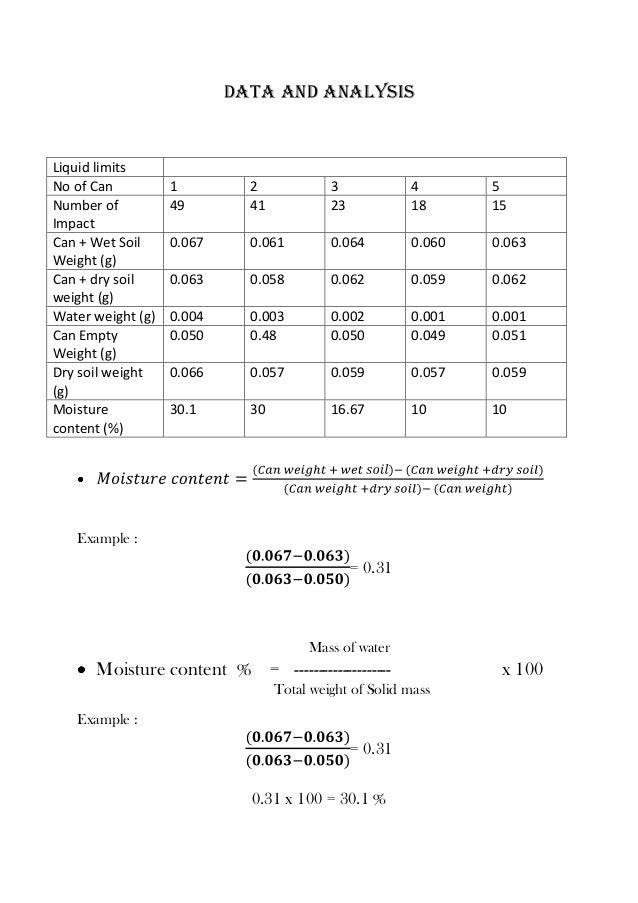
Test Report For Atterberg Limit Test"


0 comments:
Post a Comment